

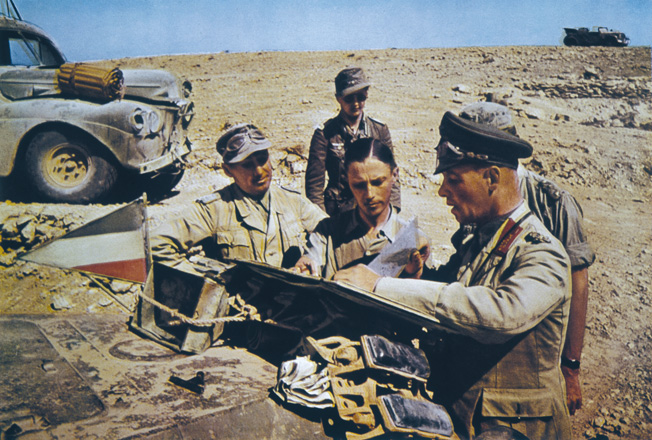
By late 1941, Rommel’s amazing skills in conducting mechanized warfare in the North African desert had driven the British out of Libya, where they had advanced, and forced them onto the defensive on the western border of Egypt.
In April 1941, Rommel was besieging Tobruk, which was barely holding up against the fierce German attacks.
Two British attempts to push Rommel back in the summer of 1941 (Operations Brevity and Battleaxe) had failed miserably.
The “Desert Fox” had won this round as well
The British, from the moment of Rommel’s appearance on this front of the war, realized that the greatest danger and the main reason for the continuous defeats they suffered were not so much the quality and quantity of the German troops, but the brilliant strategic mind of the commander of the African Corps.
This obstacle was now rising in November 1941 when the British, after intense pressure from Churchill, had decided to launch a new major offensive to repel the Axis forces and liberate Tobruk from its months-long siege.
Churchill would even sacrifice Singapore, the British stronghold in Asia, by diverting reinforcements destined for it to North Africa to help launch the new offensive, codenamed Operation Crusader.
Despite the undeniable fact of the quantitative superiority of the Eighth Army’s forces (it had more than 710 tanks and 700 aircraft, compared to 174 German tanks – plus 146 obsolete Italian ones – and 420 aircraft), the British wanted to ensure that Rommel’s brilliant mind would be absent at precisely the most crucial moment of the great offensive.
Rommel was therefore to die, and indeed at midnight on 17–18 November, as the British 30th Army Corps was to cross the Egyptian–Libyan border.
Neutralizing the “Desert Fox”
The attack on Rommel himself required that the British know his exact location on the night of the attack.
British communications interception units had long believed that they had located Rommel’s headquarters – with near-certainty – in a building in the village of Benda Littoria, near ancient Cyrene, Hannibal’s birthplace.
The British analysts’ estimates were confirmed by Captain John Heislen, perhaps the most successful British agent in the North African desert.
Heislen spoke various Arabic dialects and was familiar with the mentality and customs of the desert nomads.
Having grown a beard and dyed his skin and hair, and wearing Arab kelebiyas, he looked like one of the Bedouins who roamed the vast expanses of Libya.
One night in October 1941, Heislen parachuted near Benda Littoria and began to observe a villa on the edge of the village and a public building that the Italians called the Prefecture.
Around the buildings there were a number of radio transmission vehicles, a clear indication of the existence of some administrative formation.
After a few days he saw what he had been waiting for: Rommel himself emerging from the Prefecture and leaving in his administrative vehicle.
Two days later he met a patrol of the Long Range Desert Group (LRDG) which took him to Cairo.
The British headquarters now had the confirmation they needed to launch the Commando raid.
Beheading Plan
The operation to eliminate Rommel would be a broader attempt to behead the Axis forces, as in addition to the main objective (attacking Rommel’s headquarters) the raiding force had three others: the destruction of the Italian headquarters, the Italian information center in Apollonia, and the telephone and telegraph lines at a road junction 6.5 km southeast of Cyrene.
The attack was undertaken by Battalion C of the “Layforce” force, which had been formed in early 1941 from the 7th, 8th, 11th Commando (later renamed Battalions A, B, C, respectively) and the 50th and 52nd Middle East Commando (which merged into one unit to form Battalion D). The commander of “Layforce” was Colonel Laycock.
The commander of C Battalion was 24-year-old Lieutenant Colonel Roger Keyes, son of Admiral Geoffrey Keyes, who was head of Combined Operations Command, which oversaw all Commando operations.
Laycock considered the plan from the outset to be very daring and that there was little chance of escape for the participants even if successful.
Roger Keyes, however, literally begged Laycock not to mention this assessment to the Eighth Army staff, as there was then a possibility of the operation being cancelled.

In addition to the lives of his men, the commanders probably feared for the life or capture of the son of a high-ranking British official and member of the English aristocracy, as Keyes would personally lead the attack on Rommel.
The battle organization of the small raiding force provided for the formation of four separate raiding divisions.
The 1st Division would consist of Lieutenant Colonel Keyes, two officers, 22 Commandos and a native Senussi guide.
Their mission was to attack Rommel’s house and the German headquarters.
The 2nd Division would consist of Lieutenant Sunderland, 12 Commandos and another Senussi guide, with the mission of attacking the Italian headquarters in Cyrene.
The 3rd Section would consist of Lieutenant Chevalier and 11 Commandos, tasked with attacking the information center at Apollonia.
The 4th Section would be the command team with Colonel Laycock, two Commandos and a nurse.
It would act as a situation report center and as a liaison.
Finally, there would be a team with two Folbot canoes (from Battalion C), with two officers and two Commandos.
The canoe teams would first go ashore to identify any natural or artificial obstacles, to ensure that the liaisons on the shore were the intended ones and not German agents, and, finally, to guide the Commando boats precisely to the correct landing point.
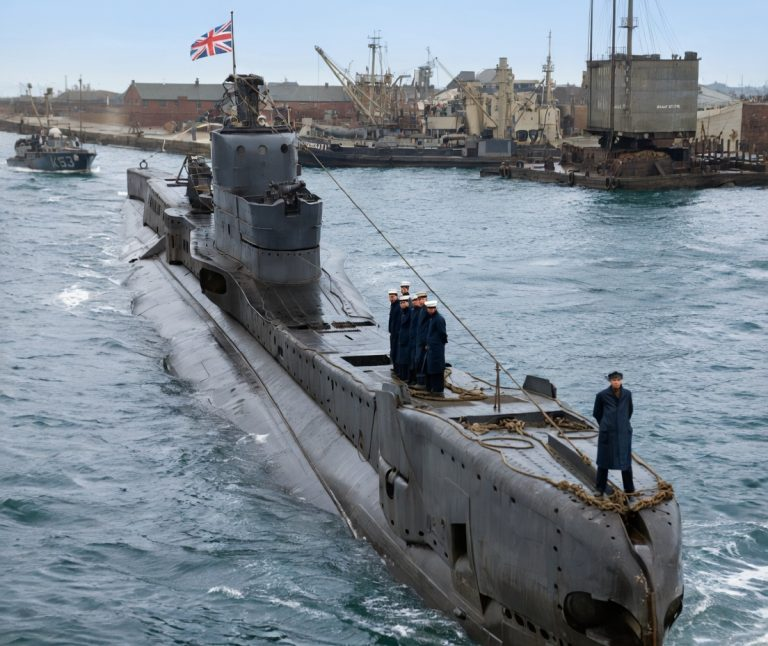
The raiding force would be carried by two submarines: HMS “Torbay”, which would carry the 1st Division and the command team, and HMS “Talisman”, which would carry the 2nd and 3rd Divisions.
The Commandos would disembark at Cheskem el-Kelb (also known as Zawiet el-Hamama) on the coast west of Cyrene.
There they would remain throughout 15 November in a temporary hiding place and on the night of the 15th to the 16th they would advance to a hiding place half the distance from the target.
There they would remain hidden again throughout the 16th and on the night of 16/17 November, the divisions would separate and reach advanced hiding places which were a few hundred meters from their targets.
From there they could observe the targets and draw up the final attack plans.
The withdrawal of the Commandos would again be carried out by submarines which would wait from the fourth to the sixth night after the day of the landing of the units (i.e. the evenings of 18, 19 and 20 November).
The withdrawal areas would be for HMS “Torbay” the initial beach, while for HMS “Talisman” a beach 5 km. further west.
The embarkation of the 59 Commandos took place on 10 November in the port of Alexandria with one minor change.
Colonel Laycock embarked on HMS “Talisman” instead of HMS “Torbay”, as Captain Glenny, who was to command the 3rd and 4th Divisions, suddenly fell ill.
The raiding force, however, started with two serious shortcomings: firstly, it did not have transmitters as they had been transferred from “Layforce” to other units and secondly there were no destroyers, as a result of which the bombing of the targets was assigned to ordinary Commandos with rudimentary training.
The role of Hazelden’s agents
A crucial role in the successful conduct of the operation would be played by Captain Hazelden’s team of agents, who had been tasked with receiving the raiding force and carrying out individual sabotage operations.
Specifically, Hazelden’s team included Captains Chapman and Mellott and Lieutenant Westall, from the Special Operations Staff G(R) of the Middle East Headquarters.
G(R) coordinated all operations of the SAS, LRDG and Commandos or any combination of them, behind enemy lines. The team was completed by two Arabs from the 3rd Battalion of the Libyan Refugee Force.
The mission of the group of agents, specifically, was to reconnoiter the coast at Cheskem el-Khelb and to send a light signal that the coast was safe for the Commandos to disembark.
They would then carry out sabotage at the headquarters of the Italian “Trieste” Division, located on the main road near the location of Slonda, destroying means of transport and cutting the telephone lines on the southernmost road, through the mountains of Jebel el-Akhdar.
The group set off on November 7, from the advanced base of the Siwa Oasis, aboard the vehicles of the LRDG T.2 patrol, under Captain Hunter.
With these they were transported to the southernmost end of the Wadi Heleigma stream.
They arrived there on 10 November, when Heislenden and an Arab continued the journey on foot, reaching the shore of Cheskem el-Kelb on the morning of 14 November.
In the afternoon they went ashore and from 18:30 they began to emit light signals into the sea every 15 minutes, as had been agreed, to notify the submarine they were expecting that the shore was safe for the Commandos to disembark.
Problematic landing
Forty-five minutes after the first signals were emitted, HMS Torbay received the pre-agreed signal from Heislenden and at 19:56 Lieutenant English and a corporal were sent out in a canoe to make sure that it was indeed Heislenden who was sending the signals.
In turn, Inglis sent a signal to the submarine that the disembarkation could begin.
The inflatable boats that would carry the Commandos were placed on the deck of the submarine, which was submerged slightly to allow the boats to be released to the surface.
At that moment, a large wave swept over the deck and 4 of the boats were swept out to sea along with a soldier who could not swim.
Despite the rough seas, all the boats and the soldier were collected and at 21.15 the disembarkation began with an initial wave of 7 boats.
In the meantime, Inglis returned to HMS “Torbay” to see what was the cause of the delay.
In the attempt to lift the canoe, its frame was destroyed, as large waves were now beating the submarine, since the weather had deteriorated to a dangerous degree.
The inflatable boats also encountered problems, which capsized several times, until the Commandos were able to row to the shore.
The last boat left the submarine at 00.30 after having previously capsized three times.
The disembarkation, which had been calculated to last 1 hour, had lasted 5 full hours (!) while the Commandos and their equipment were soaked by the sea.
At 00.35 on 15 November, HMS “Torbay” sent a visual signal to HMS “Talisman” that the disembarkation of the Commandos it was carrying had been completed.
HMS “Talisman” reached the shore at 01.45 and the Commandos deployed their inflatable boats on deck.
However, the bad weather repeated the scene that had preceded the other submarine, as a large wave swept 7 of the 8 boats from the deck along with 11 soldiers.
The submarine then moved away from the shore to reduce the impact of the large waves and attempted to send a canoe to help collect the men and boats.
Unfortunately, this canoe was also destroyed during its launch.
The commander of HMS “Talisman”, then told Lieutenant Sunderland to throw the remaining boats into the sea and the Commandos to jump into the water after them.
This was done, but in the end only one boat managed to sail properly with its passengers on board and reach the shore.
Colonel Laycock and 7 Commandos were on board.
It was now 04.00 and the moon had risen fully in the sky when the last men and boats were collected from the sea.
No further attempts were made to disembark, as the submarine had to leave to charge its batteries.
Furthermore, there were not enough boats to transport the Commandos and the two canoes had been damaged, making it impossible to tie up the boats that had come ashore and tow them to HMS “Talisman”.
Laycock therefore sent a signal to stop the disembarkation and to repeat it the following night and if possible to collect the boats because there was a risk of discovery by the enemy.
Modification of the plan
The problematic landing, due to weather conditions, resulted in only 36 Commandos reaching the shore, which created difficulties in implementing the original plan of the raid.
Laycock had two options: either to delay and wait for the landing of the remaining Commandos the following night, or to continue with the existing force and modify the plan of action.
He preferred the latter as it was of paramount importance that the raid on Rommel’s headquarters take place precisely at midnight on 17/18 November, when the attack of the 8th Army would take place.
Therefore, HMS “Talisman” at 09.35 on the morning of 16 November received a signal to withdraw and not land any more soldiers.
The new plan called for the attack on Rommel’s headquarters by the 1st Division under Keyes, which would have Captain Campbell and 17 Commandos with it.
The other group, formed by 6 Commandos and Lieutenant Cook, would undertake the destruction of the lines of communication at the junction south of Cyrene, which would be carried out by Lieutenant Sunderland’s 2nd Division, which had not yet landed.
Laycock himself and two Commandos would remain at the force’s regrouping point as liaison, while Heislen would destroy the communications on the Lamlunda–El Faydia road, as planned.
Approaching the objective
The two British groups set off at 19:00 on 15 November with two Arab guides provided by Heislen as the Senussi guides had not disembarked.
After a few kilometres, however, the Arabs refused to continue and the Commandos proceeded alone, arriving at dawn at a dry riverbed where they spent the night.
There on the morning of the 16th they were discovered by Arabs who proved friendly and led them to a point 16 km away from Benda Littoria, which was chosen as a regrouping point.
The Commandos’ march to their objective was brutal due to the weather conditions.
From the moment they disembarked, they were soaked and freezing as it was raining continuously and the temperature was very low.
The Commandos were forced to travel the 30 km to Rommel’s headquarters and climb to an altitude of 600 meters under these conditions, hiding during the day and walking at night.
At the regrouping point, the Commandos stayed all day and were informed by Heislen that Rommel and his staff were staying in a house in Sidi Rafa and not in the building in Benda Littoria, as the information initially said.
This was also confirmed by Arabs who seem to have had no doubt.
Therefore, on the evening of the 17th, Keyes’ group was led by Arab guides to a point a few hundred meters from the new objective.
At the same time, Lieutenant Cook’s second group of raiders also reached its objective (the crossroads south of Cyrene).
In the final hiding place, Keyes had time to observe the objective and draw up the final plan of attack on the house where the commander of the Afrika Korps lived.
His last orders provided for: the attack on the house by himself, Captain Campbell and Sergeant Terry, while the attack on the power plant would be undertaken by three Commandos.
The rest would take up positions around the main objective so that there would be no escape route for Rommel and his staff.
Five men would watch the exits from the shooting range and the car park, two would stay outside the hotel, two would be on the street on either side of the house and two more would guard the entrance to the house from which Keyes and his team would storm.
Attack with casualties
At precisely 23:59 on 17 November, Keyes and his men took up positions around the building where Rommel was supposed to be sleeping.
Together with Campbell, Keyes searched the back of the building but discovered that there was no access through the windows or doors.
They therefore went to the front entrance and knocked on the door, demanding that Campbell, who spoke fluent German, open it for them.
A guard opened the door and Keyes attacked him, trying to kill him silently so as not to wake the occupants of the house.
However, the German grabbed the barrel of Keyes’ Thompson submachine gun, resulting in a struggle between the two men.
Keyes, as he was wedged between the outer and inner doors of the entrance, was unable to draw his dagger to stab the German in the neck.
The situation was resolved by Campbell, who shot the German with his .38 revolver, but this caused the occupants of the building to rise.
Some of them tried to go down the stairs leading to the first floor, but a burst from Sergeant Terry’s Thompson made them retreat.
Keyes and Campbell, after searching some of the rooms in the ground floor corridor, discovered a door with a crack through which light was coming.
Keyes opened the door and found himself facing about 10 Germans wearing helmets, at whom he fired a volley and closed the door again.
Campbell told him that he was going to throw a grenade and Keyes opened the door.
This time, however, the Germans were waiting for him. As the grenade fell into the room, the Germans caught up and shot Keyes, who was mortally wounded by a volley in the chest.
According to another account of the incident, Keyes was killed as soon as he opened the door, while Sergeant Terry and Campbell cleared the room, the latter throwing the grenade and the former following and mowing down the area.
In any case, after the fight there was silence and Terry and Campbell dragged Keyes out the front entrance where they found him dead.
Campbell returned inside the building and after searching the other rooms, without discovering anyone, he left through the back door of the house.
There he was shot by his own men, who mistook him for a German trying to escape.
With his lower leg broken by a bullet, Campbell realized that there was no chance of following the rest of the Commandos to the shore.
He therefore ordered his men to abandon him. But first he ordered them to gather up whatever grenades were left and throw them into any open windows.
The sound of a battle a few hundred yards away, where there were no British, indicated that the Germans had panicked and in their confusion they began to exchange fire with each other.
Their losses, the Commandos believed, included several soldiers and at least two staff officers, but the main target, Rommel, does not appear to have been among them.
Fate saves Rommel
Indeed, Rommel was in Rome that night celebrating his birthday, having taken leave two weeks earlier for health reasons.
But even if Rommel were in Africa, it would still be impossible for the Commandos to kill him, as his headquarters had been moved from Benda Littoria to much closer to the front line, near Gabout, between Bardia and Tobruk.
According to one view, Heislen’s discovery of Rommel was probably due to a coincidental visit by the German general to inspect or talk to the Afrika Korps logistics manager, as the house in Benda Littoria now housed the German supply headquarters.
Another view is given by the testimony of the commander of the supply headquarters, Colonel Schlüssener, in July 1946, while he was a prisoner of war in Germany.
According to Schlüssener – who was absent from the headquarters in Benda Littoria on the night of the raid due to illness – the building never served as Rommel’s headquarters.
Regarding Heisslen’s view of Rommel, he claimed that he must have seen the Chief Surgeon and confused him with Rommel, as both had the same physical dimensions and wore similar uniforms.
Schlüssener also said that two days before the raid, rubber dinghies were found on the shore, at which point it was decided to place a guard at the entrance to the headquarters, which had been unguarded until then. It was about the cause he fought for with Keyes.

As for the losses, the German officer stated that they included the death of a lieutenant and a second lieutenant of his staff.
Finally, he revealed that the adjacent Italian headquarters was not attacked and that during the attack on an electric wire pylon, only one of its four concrete columns was destroyed. Schlüssener’s description of the performance of the remaining raiding units is almost accurate.
Heisslen did not actually attack the headquarters of the Italian “Trieste” Division, as it had withdrawn from the area to the southeast.
His only target remained the telephone cables, which he cut on the main road near Sidi Mohamed-el-Homri.
The 2nd Division attacked the power station, but were unable to blow up the dynamo as the detonators had been rendered useless by the sea water and the constant rain.
The British later claimed that they had finally disabled the dynamo with hand grenades.
According to German documents that later fell into Allied hands, an explosion occurred at the crossroads south of Cyrene, while a fuel distribution centre was attacked and the raiders escaped. These actions were probably due to Lieutenant Cook’s team.
Escape
Sergeant Terry and his men managed to reach the pre-agreed regrouping point at 17:00 and meet Laycock. On that day they were discovered by friendly Arabs who informed them that the place where they had hidden the boats was unsafe.
They offered to hide them themselves, which the British accepted, but then left without telling them where they had placed them. The next Arabs to discover the Commandos were anything but friendly and quickly left to inform the Germans.
By evening, however, no enemy unit had been seen and HMS “Torbay” soon appeared to pick up the Commandos. However, this was impossible for the time being as the bad weather did not allow the boats to sail safely.
In addition, the raiders from the land sent a signal asking for Mae West lifeboats, as they would have to swim to the submarine since they did not know where the boats were.
This request seemed strange to the submarine commander, as he knew that the Commandos had come ashore wearing two life jackets each.
Finally, at 22.50, a boat was sent with 23 life jackets, food and water, which was carried ashore by the wave since it was not possible to board Lieutenant English due to the severe sea conditions.
The raiders’ report of the death of Keyes and the missing men of the 2nd Division gave the impression to the commander of HMS “Torbay”, Captain Myers, that the Commandos were in danger of being captured at any moment.
Therefore, he proposed that the submarine approach a distance of about 100 meters from a small headland to the west of the coast and that the men swim to it.

Laycock, however, fearing that his exhausted soldiers would be in danger on this night swim in a wild sea, sent a signal that they would try tomorrow when, according to the Navy, the weather was expected to be better.
An hour before first light on the morning of 19 November, the Commandos took up perimeter positions, divided into two sections, one west and one east of the hiding place.
Nothing happened for the rest of the morning, but at noon gunfire was heard from the west. A large force of Carabinieri and Arabs began a fierce attack on the British positions.
Contact with the western section was soon lost, while the eastern section, led by Laycock, was divided into three-man groups, which were ordered by the colonel to move east and try to make contact with the westward advancing forces of the British 8th Army.
The only ones who would remain behind would be Lieutenant Prior, who had been seriously wounded in the leg, and a nurse, who surrendered to the Italians.
Colonel Laycock and Sergeant Terry remained together after the group broke up and hid in the hills of the Jebel-el-Akhdar mountain range.
On the next two nights (20/21 and 21/22 November) they attempted to go down to the coast and head for the alternative rendezvous point from HMS “Talisman”, but intense enemy activity prevented them from doing so. Therefore, they decided to move east.
On their arduous journey they were greatly assisted by the friendly Arab tribe of the Senussi, who supplied them with bread and goat meat. As for water, the constant rainfall ensured that they had plenty.
Their escape from the Italian search parties was easy in the mountainous terrain of Jebel-el-Akhdar, but they encountered great difficulties from the Arab Carabinieri who were well versed in the art of tracking.
However, their tactic of hiding during the day and traveling at night through the dry riverbeds that the enemy had already explored, ensured them safe passage through enemy territory.
Finally, the odyssey of the two Britons ended 41 days after their landing in Cyrene, that is, on Christmas 1941.
Another member of the raiding force who returned safely was Captain Heislen, who on 1 December was picked up by the LRDG’s T.2 patrol, under Lieutenant Croucher, and arrived at the Siwa Oasis.
As for the fate of the remaining Commandos, the news that the Arabs brought to Heislen was bad.
On the morning of the 18th, the Germans had captured two Britons and then five more, which meant that it was Lieutenant Cook’s 2nd Division.
A map was found on one of the British which marked the coast at Cheskem-el-Kelb, which explains the discovery of the position by the Italians and the attack that followed.
However, there was no information about the Commandos who were scattered on the coast. They were either killed, captured, or lost in the desert, trying to escape.
However, the Commandos who were captured were not executed by the Germans, at least while they were in North Africa, as Rommel, who returned two days after the raid, ignored Hitler’s order that all Commandos who fell into German hands be executed.
Of course, we do not know whether the same was true when the Commandos were transferred to Germany or Italy to a concentration camp.
On the contrary, Rommel ordered that Keyes be buried with full military honors along with the four Germans killed during the raid.
