


In 1943, MacArthur and his forces advanced along the Solomon Islands–Bismarck Archipelago–New Guinea axis, with the ultimate goal of recapturing the Philippines.
The US Navy, however, had preferred a more direct and direct route, which would lead it to the “heart” of Japan, the Gilberts–Marshalls–Carolines–Mariana Islands axis. From there, the capture of Iwo Jima, Bonin, and Okinawa would place the country’s production centers, bases, and cities within range of American strategic bombers.
The Japanese, anticipating the coming danger, had created an outer defensive zone in the archipelagos of the Marshalls, Bismarck and Gilbert Islands, consisting of strongly fortified islands that usually had airfields, which could be exploited by American forces.
According to the Japanese strategic plan, the American amphibious forces, facing strong resistance, would be forced to remain around the target island, providing time for the Japanese Fleet (which was chartered on the island of Trak) to intervene with the assistance of air forces from land island bases and destroy the American ships.
The control of the Gilbert Islands was the first step that the US Navy decided to take in order to break up the Japanese defense zone in the central Pacific.
Located 2,500 miles southwest of Pearl Harbor and 1,200 miles from Truck Island, Tarawa Island was the central island of the complex and the main base and headquarters, along with the only Japanese airfield in the area.
The choice of target suited the situation in which the US Fleet was in, which was being reborn, but was not yet strong enough to undertake a more daring attack directly on the Marshall Islands, as some senior officials desired.
Furthermore, Truck Island was further from the Gilberts than the Marshalls, although after the events of October 1942, the Japanese fleet had been left without air cover, as almost all of its aircraft carriers had been destroyed during air battles in the skies over New Britain, trying to intercept the American attack on Bougainville Island.
Admiral Nimitz assigned the operation to capture the Gilberts to Vice Admiral Raymond Spruance, who would lead the naval force and have overall supervision of the operation. The amphibious forces would be commanded by Rear Admiral Kelly Turner, while the Marine force would be under the command of General Holland Smith.
All three commanders were characterized by good strategic thinking and perception and above all by their aggressive spirit, and they would lead the Marines in the first – in world history – violent landing against a strongly fortified coast.
Until then, the United States Marine Corps (USMC) had conducted landings in the Solomon Islands, which met with zero or light and disorganized resistance. This time, however, things would be different for the 2nd Marine Division under General Julian Smith, which was assigned to occupy Tarawa.
Tarawa: the fortress island
Information and reconnaissance about the island of Tarawa had revealed a very strong defense that was centered on the coastline, according to the Japanese concept of destroying the enemy, at the point where the sea met the land.
The island was essentially an atoll consisting of islets connected by coral reefs, forming a skeletonized triangle based on the islet of Betio, 12.5 miles long to the south, whose edges to the west and east were connected to two other islets that, converging to the north, joined, creating the triangular shape of the atoll.
Betio was also the only point where there seemed to be Japanese activity and installations, since the airport was also located there. Reconnaissance by American aircraft and submarines had not fully revealed the extensive fortifications along the coast.
The latter had rows of machine guns, gun emplacements and strong points along them, which created overlapping firing ranges. These housed – according to American estimates – 8 8-inch coastal defense guns, 25 heavy and medium anti-aircraft guns, while 82 anti-landing gun emplacements and 52 machine gun emplacements had been identified.
After the battle it was revealed that there were 20 large guns of 80 mm. to 8 inches, 25 guns of 37, 70 and 75 mm., 7 light tanks with 37 mm guns, as well as 31 heavy machine guns of 13 mm.
All these fortifications were completely covered by an inner core of reinforced concrete, which was covered by rows of palm trunks and coral sand, which created an absorbent layer, resistant even to direct shots from large-caliber bombs and shells.
The only way to neutralize these fortifications was to kill those inside.
In addition to these fortifications, there were countless trenches, isolated trenches and machine-gun nests, also protected by trunks and sand, whose crossfire completely covered the coast and the sea up to the coral barrier. An unspecified number of 7.7 mm. machine guns were placed in these positions.
In addition, the island was surrounded, within 50-100 yards of the shore, by a double fence of barbed wire, concrete tetrahedrons on the coral reefs, and other barbed wire obstacles, which channeled attackers into killing zones covered by machine gun fire.

The greatest obstacle, however, was the coral reef, which surrounded the island at a distance of 700-1,000 yards from the shore and which at low tide protruded from the surface of the sea, prohibiting the passage of ships. This reef also proved to be the cause of the enormous losses of the Americans, who did not calculate correctly and did not deal with this problem properly.
The Tarawa garrison numbered 4,836 men, of whom 1,122 belonged to the 6th Special Naval Landing Force Yokosuka, 1,497 to the 7th Special Naval Landing Force Sasebo, 1,247 to the 111th Construction Unit, and 970 to the Construction Department of the 4th Fleet.
The first two units contained fanatical and experienced fighters – according to American journalists – the Japanese Marines, who had been tested in previous battles and had very heavy weapons.
The commander of Tarawa was Vice Admiral Keiji Shibasaki, who was based on Betio, housed in a sand-covered concrete behemoth that resembled a hill. Similar forts housed the communications and ammunition depots of the 3rd Special Forces Base, which Shibasaki commanded.
Even after the Normandy landings, the beaches of Betio – with the possible exception of Iwo Jima – were considered by the US Army to be “the best-protected beaches against landing forces of any beach attacked in any theater of World War II.”
Preparations for Operation Galvanic
The base of operations for Operation Galvanic was New Zealand, specifically the North Island, where the 2nd Marine Division was encamped, recovering from the fighting on Guadalcanal.
All of the Division’s units, the 6th and 8th Marine Infantry Regiments, the 10th Artillery Regiment, and the 18th Engineer Regiment, had taken part in the fighting in the Solomon Islands and had distinguished themselves, receiving the Presidential Unit Citation (PUC) along with the 1st Marine Division.
With the mission of attacking Tarawa and Betio Island in particular, Lieutenant Colonel David Sup, the division’s operations officer, began planning the landing and devising ways to overcome the problems created by nature and the enemy around Betio Island.
The first and main obstacle was the barrier of the coral reef that surrounded Betio for 700-1,000 yards from the shore.
The main question was the depth of the water above the reef to allow passage of the landing craft personnel (LCVP) and vehicle (LCM). A fully loaded LCVP required at least 3.5 feet of water depth to pass over the reef, while a fully loaded LCM with a 30-ton armor required at least 5 feet.
Admiral Turner’s group of natives and local whites, known as “Turner’s Foreign Legion”, claimed that on the night of February 20 (when the landing was to be made) the depth of the reef would be 5 feet. However, Major Holland, who had lived on Tarawa and made a hobby of observing tidal phenomena, claimed that the depth would probably be less than 3 feet.
Lieutenant Colonel Sup, faced with this problem and the problem of exposing his men to enemy fire until they reached the shore, considered using the LVT-1 tracked amphibious tractors in the first landing waves, which were already used in material and supply transport tasks by Marine units but had never before been used as assault combat vehicles.
The 2nd Marine Division had 100 LTV-1s, of which 75 were operational, the main drawback being the lack of armor. Sup ordered them to be roughly armored with metal plates and rails, while he also requested all the LVT-2s (a newer version of the LVT-1) that had been put into service in the United States.
The LVT-2s were armored, had a speed of 7.5 knots instead of the 7 knots of the LVT-1, and carried 20 Marines instead of 18. Fifty of these amphibious vehicles were assigned to the 2nd Marine Division.
The LVT-1/2s would be capable of crossing the reef barrier, even if it protruded from the sea surface, while also providing rudimentary protection from small arms fire. However, subsequent waves of Marines, heavy weapons, and tanks would be landed by LCVPs and LCMs, as long as the reef permitted.
Simultaneously with the Marines, the Navy began preparing the naval force that would transport and support the Marines. This mission was undertaken by Vice Admiral Harry Hill. The situation he found upon arriving in New Zealand was more than disappointing.
The head of the landing fleet, Admiral H. Knowles, had discovered that these ships suffered from a complete lack of communications systems, as a result of which Army radio operators were installed with portable radios, which certainly did not fully satisfy the communication needs of a landing.
Hill himself on his flagship, the battleship “Maryland”, did not have radios for communication with the coast and only after his orders were some radios placed on the bridge, which, however, when the 16-inch guns were raised, were at the same height as their barrels.
The significance of this fact would be understood by the Americans when the landing had begun. Although the Navy was already building special amphibious ships, these would not be ready until well after the landing on Tarawa.
With the completion of the concentration of personnel and assets, the Marines and Navy engaged in test landings on the coast of New Zealand, attempting to smooth out problems and settle the final details of the operation.
Planning and New Doctrines
The plan for the occupation of Tarawa and specifically Betio Island envisaged the use of the 2nd Marine Division for the first time, based on a new doctrine for conducting landings, the Landing Regiment and Battalion (LRB and LRB).
The fleet landing exercises (FLEX) conducted up to that point and the valuable combat experience in the Solomon Islands complex had led the Marines to the conclusion that the regiment and battalion carrying out the landing must be autonomous in terms of service support (logistics) and combat. Therefore, they should have organically integrated transport, medical, heavy infantry, artillery and engineering units.
Thus, the 2nd and 8th Marine Regiments of the 2nd Division were renamed the 2nd and 8th SAS, each having been reinforced with a 105 mm artillery squadron, while the battalions that would take part were renamed the SATA and each had been reinforced with a 75 mm howitzer squadron, a tank company, and an engineer platoon.
The Marine battalions were already reinforced with several automatic weapons, organically integrated into the platoons and Marine teams, although two months after Tarawa the organization would change, emphasizing the action of four-man teams as more flexible tactics for infantry combat from the pack.
The 2nd Marine Division went to Tarawa with the usual three-man formation, namely: a regiment of 3 battalions, battalions of 3 companies, companies of 3 platoons, and platoons of 3 teams of 9 men (with 1 BAR machine gun) and a machine gun team (with a team leader, 5 riflemen, and 2 BARs). In total, the Marine platoon had 5 BARs.
From April 1943, however, the machine gun team was abolished, while the teams became 12-man with 2 BARs, so that 2 half-teams of 6 men with 1 BAR each were created, while in 1944 another BAR was added, so that the team was subdivided into 3 sub-teams of 4 men with 1 BAR each.
The 2nd and 8th Marines would contribute the 3/2nd Battalion under Major Settel, the 2/2nd Battalion under Major Herrett, and the 2/8th Battalion under Major Crowe. The Marines would land in 3 waves. The first wave would consist of 42 LVT-1s and 8 reserves, the second of 42 LVT-2s, and the third of 21 LVT-2s and 5 reserves.
The landing force would enter the opening of Tarawa Lagoon, north of Betio Island, and land on the northern shores of the island, which contained the fewest minefields, hoping that the Japanese fortifications would be mostly facing the ocean. As it turned out, they also completely covered the inner lagoon of Tarawa.
The beach had been divided into three landing beaches: “Red 1” where the 3/2nd Battalion would land, “Red 2” where the 2/2nd Battalion would land, and “Red 3” where the 2/8th Battalion would land. The 1/2, 3/8, and 1/6th Marine Battalions had been retained as reserves, while “Green Beach” on the western end of Betio had been designated as an additional reserve beach. Special provision had been made for the neutralization of the 500-plus yard long breakwater, which was located on the dividing line between “Red 2” and “Red 3” beaches.
The pier jutted into the lagoon, creating a danger for the landing parties, as snipers and machine gunners could flank the Marines. The neutralization of the pier was undertaken by the 2nd Scout-Sniper Platoon of Second Lieutenant William Hawkins, which would be accompanied by a 6-man group of destroyers with flamethrowers.
Of great importance for the success of the landing would be the preliminary naval and air bombardment, according to which 30 minutes of air attacks were foreseen, followed by 120 minutes of bombardment by 3 battleships, 5 cruisers and 9 destroyers.
Of the 120 minutes, 75 would be devoted to destroying coastal guns and forts, while the remaining 45 would be devoted to destroying Japanese positions that were Marine targets.
Finally, as the LVTs approached the shore, the aircraft would return for a final 5-minute assault on the shore.
Most Americans believed that the island would disappear under the amount of explosives it would receive, but Admiral Knowles and several Marines who had taken part in the Gavaudou landing knew that the naval bombardment there, which lasted from morning to noon, had disappointing results.
The Marines’ final means of support were two destroyers, which would enter the lagoon with the minesweepers to protect them, as the latter would clear any minefields. The destroyers would then support the Marines.
The 2nd Marine Division embarked on the transport ships in late October, believing that they would be heading to Hawke’s Bay, New Zealand, for exercises. Only the high command knew the reality. The landing force’s stopover was the island of Efate in the New Hebrides, where Knowles’ and Hill’s fleets met and test landings were conducted.
It was not until 14 November that Admiral Hill allowed the Marines’ actual mission to be announced.
As the armada headed for Tarawa, the Marines on the decks of the ships began sharpening their bayonets and K-bar knives, cleaned and re-cleaned their weapons by coating them with a thin layer of oil, and when the ammunition was distributed, the most meticulous checked each cartridge individually.
Towards the shores of Betio
On the night of 20 November, the moon rose shortly before 00.01 and the two fleets took up their pre-determined positions. The covering force of battleships, cruisers and destroyers took up positions west of Betio, so that their fire would hit the island along its longitudinal axis and there would be no chance of any projectile escaping towards the waves of the landing party.
At 03.55, the landing party took up positions 6 miles north of the entrance to the lagoon and began to launch the LCVPs and LVT-1/2, so that the Marines could follow by descending from the nets on the sides of the landing parties.
The LVT-1/2 and LCVPs loaded with Marines were heading to the formation and waiting areas for the landing waves. At 04:31, Hill ordered the landing fleet to return to its original position, as a 2-knot sea current swept it southward into the line of fire of the warships. At 04:51, a red flare appeared on the horizon and a few minutes later the Japanese coastal guns opened fire on the landing forces.
The naval bombardment, which had been scheduled to begin at 06:30, half an hour after the 06:00 air bombardment, was forced to begin in response at 05:07, with the 16-inch guns of the “Maryland” inaugurating the merciless pounding of Betio. Soon the island was covered in thick smoke, with fiery mushrooms rising from the strikes on Japanese fuel and ammunition depots.
At 05:42, Hill ordered a ceasefire, allowing the planned 06:00 air raid to be launched. However, the airmen had decided to launch their attack after dawn, in order to distinguish their targets. The gap created gave the Japanese the opportunity to resume their bombing of the landings, but without success.
Hill attempted to communicate with the aircraft, but the recoils from the Maryland’s gunfire had damaged the radios that had been temporarily installed on the ship’s bridge. At 06:05 Hill ordered a resumption of the naval bombardment, which was interrupted after a few minutes, as the aircraft appeared.
The half-hour aerial bombardment was limited to just 10 minutes, in order to adhere to the landing schedule. However, the smoke from the naval bombardment and the first bombs from the aircraft prevented the accurate release of the bombs, which simply opened large holes in the sand.
Shortly after dawn, the minesweepers “Pursuit” and “Requisite”, covered by a smoke screen from some LCVPs, entered the entrance to the lagoon and began clearing the area of mines. The effort was covered by the destroyers “Ringgold” and “Dashiell”, which with their guns managed to silence the Japanese guns at the entrance to the lagoon.
At 07.15 the “Pursuit” had taken position at the starting line of the landing waves and had turned on its searchlight, the beam of which was directed towards the passage of the lagoon, in order to guide the incoming LVTs and LCVPs through the thick smoke that covered the area.
The time when the Marines were to touch the shore (H-Hour) was at 08.30, however the LVTs, facing a strong headwind and due to the confusion with the preparatory bombardments, were already 24 minutes behind the landing schedule. Hill postponed H-Hour to 0900.
The five-minute aircraft sweep scheduled for 0825 was moved to 0855, but when it took place, the results were nil, and the LVTs were still at sea. When the aircraft attacked, the naval bombardment was moved inland, leaving the LVTs exposed for 10 minutes, with only the guns of the destroyers Dashiell and Ringgold and the twin .50-inch machine guns carried by the LVTs.
Bloody Shores
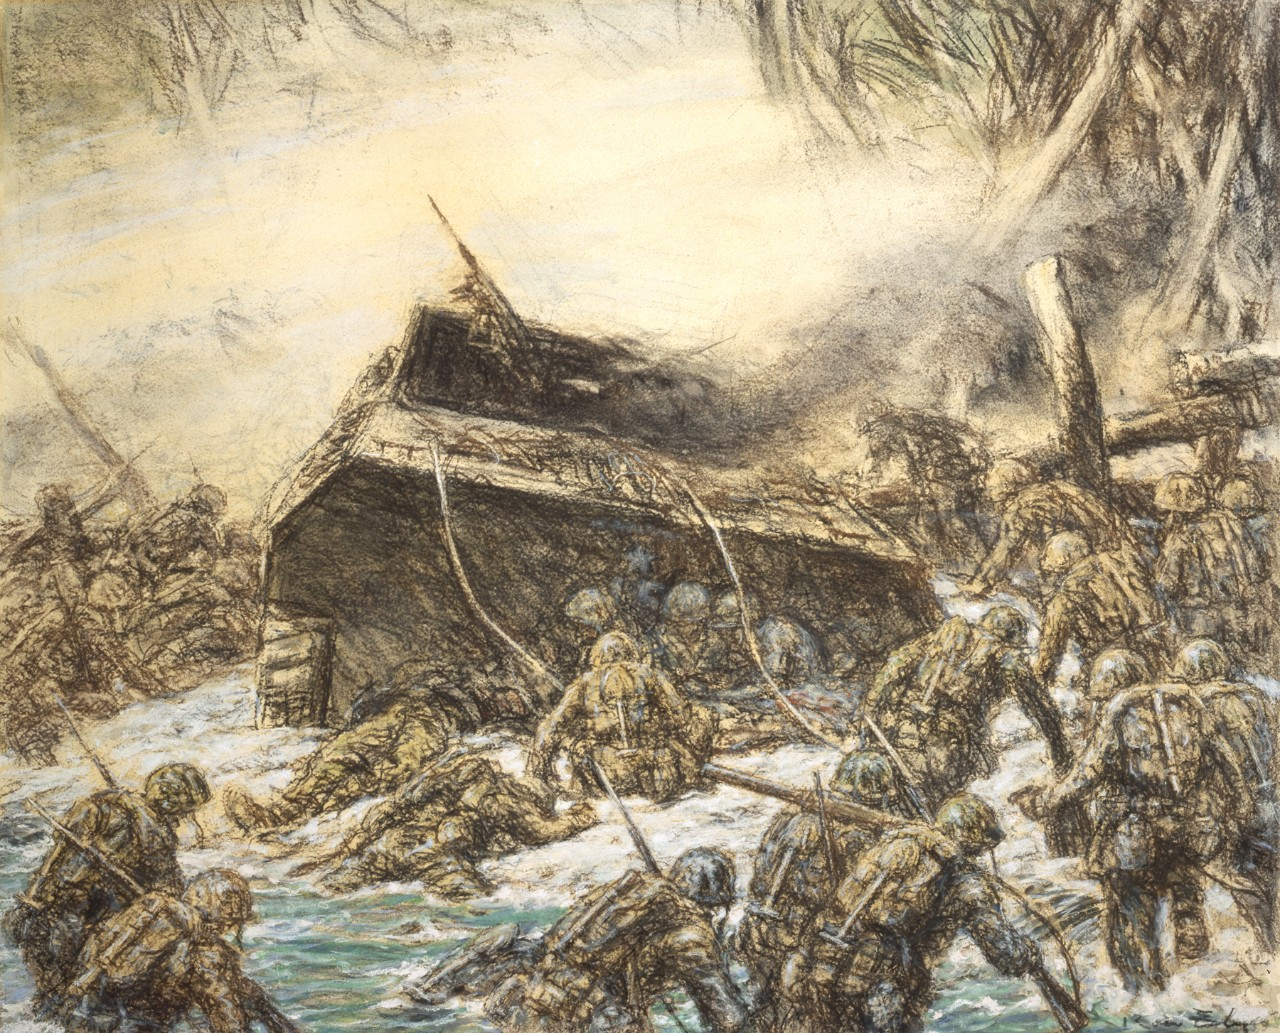
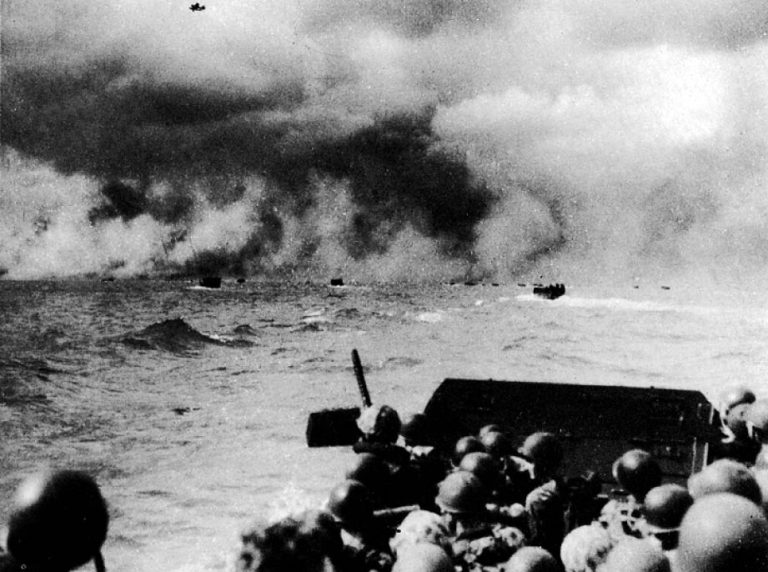
The LVTs’ machine guns opened fire as soon as their tracks began to turn, overcoming the barrier of the coral reef inside the lagoon. They were already under enemy fire at a distance of 3,000 yards from the shore, receiving timely rounds that caused sporadic casualties to the Marines in the open amphibians. Once they had crossed the coral reef, the fire was joined by dozens of machine guns from the machine guns on the shore.
Meanwhile, at 08:55, Second Lieutenant Hawkins’ 2nd Reconnaissance-Sniper Platoon was the first Marines to land on Betio. The LCVP carrying them was caught at the edge of the pier as American aircraft were “mowing” the shore. Hawkins’ men, armed with flamethrowers, ran along the pier towards the shore, searching for Japanese positions.
They discovered two machine gun nests, which they set on fire with the flamethrowers, and the fire spread to the pier, creating a large gap in the wooden structure, thus preventing the enemy from moving into it and flanking the Marines who would come ashore.
At 09:17, the first LVTs of the 2/8th Marine Battalion came out onto the shore “Red 3”, having the unique fortune of being covered by the fire of the “Dashiell” and “Ringgold”, which were clearing Japanese machine guns and artillery from a distance of a breath. The 2/8th would be the battalion with the fewest casualties (at least 25% of the 522 men of the three assault companies).
In “Red 2” the 2/2nd Battalion was facing deadly fire. Several LVTs had been hit directly by artillery shells and long-range weapons, causing the surviving Marines to jump into the sea, trying to get to the shore, where most were “mown down” by the fire of coastal machine guns.
But those who reached the shore on the LVTs had no better luck, as when the amphibians came ashore at 09.22, the Marines who were leaving began to fall dead from fire coming from the front as well as from their right and left.
Company E was pinned down a few yards from the shore, Company F lost half its strength just reaching it, and Company G, also suffering heavy casualties, was pinned between the sea and the Japanese log barrier on the shore. There was no shortage of heroics as the desperate Marines tried to force a way through the enemy fortifications.
Sergeant William Bordelon, a pioneer of the 1/18th Marine Engineer Battalion, led his four surviving men to the shore and, using explosives, blew up two Japanese machine guns. While attacking a third machine gun, he was wounded but continued to fight. His attempt to blow up some Japanese trenches was ended by a burst that killed him.
The sergeant would win one of four Medals of Honor awarded to the 2nd Marine Division on Tarawa.
The 3/2nd Battalion’s landing at “Red 1” was disrupted by a complex of Japanese fortifications on the boundary between “Red 1” and “Red 2.” Company K suffered particularly heavy casualties as the LVTs were hit by anti-tank guns, forcing the Marines to head for shore in chest-deep water. They then took over the machine guns, which easily took out these unwieldy targets.
Marine casualties were particularly heavy among the officers. The commander of 2/3, Major Crowe, swam to “Red 3” when the LCM carrying his command team ran aground, but Lieutenant Colonel Herbert Amey, commander of 2/2 Battalion, was killed by a gust of wind when he abandoned his LVT after it became entangled and immobilized in a barbed wire fence.
The third commander, Major Settel of 3/2, was forced to land on the wrong shore, on “Red 2” instead of “Red 1”. The general confusion caused by the late and erratic arrivals of the landing waves was compounded by faulty radios rendered useless by their immersion in salt water.
Meanwhile, a much greater bloodshed was taking place on the coral reef than on the shores of Betio. The LCVPs of the second and third waves could not find the 3.5-foot depth required for their displacement to pass over the reef, and as a result they stalled and landed the Marines 700-1,000 yards from shore.
The hundreds of slow-moving figures of Marines trying to reach the shores of Betio were met with a terrifying barrage of artillery shells, anti-tank weapons, machine guns, and snipers.
Those who escaped the deadly fire joined the ranks of Marines piled up a few meters from the shore, while the less fortunate perished under the weight of their weapons in deep wells on the bottom of the lagoon.
The horrific losses suffered by the first wave reached 70% of the men who landed with the first 42 LVT-1s. The second and third waves met the same fate as the first, causing the reinforcements, Major Kyle’s 1/2nd Battalion and Major Ruud’s 3/8th, to be released. The coral reef stopped these reinforcements as well, which began to be decimated by Japanese fire.
After a while, Major Ruud reported that the third wave had effectively ceased to exist and that the fourth wave had retreated, leaving the wandering Akatos targets for the Japanese long-range guns.
Those Marines who were rescued tried to approach the pier, which offered relative protection, and moving along the structure reached the shores, reinforcing the lines of the first waves. Along with them on the shores of “Red 1,2,3” arrived the operations officer of the 2nd Marine Division, Colonel Sup, with his command team, trying to organize the chaos on the shores.
The First Critical Night
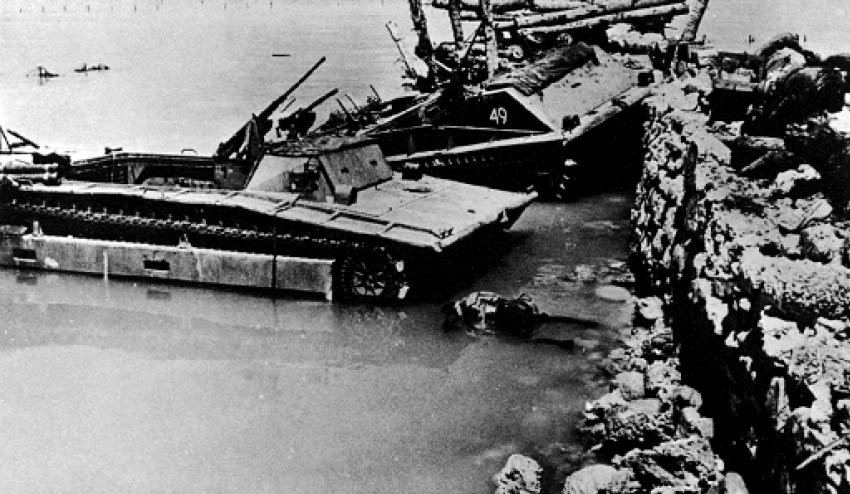
A few hours before nightfall, the greatest help to the Marines on the beach was the landing of the Sherman tanks of the Marine Tank Battalion. The LCMs carrying them also fell into the reef barrier, causing the tanks to land in shallow water. Drivers preceded the tanks to avoid the wells in the lagoon floor.
However, several of them were hit by anti-tank weapons and some sank in the invisible wells of the lagoon.
The arrival of even a few tanks on the beach gave impetus to the Marines’ offensive momentum, as their 75 mm guns blew up Japanese machine guns and trenches at close range. At the same time, infantry and engineer teams, using the blowtorch and corkscrew tactic, began to destroy Japanese fortifications.
Marine sappers drove enemy machine gunners away from their firing ports by spraying flammable liquid from flamethrowers, while others placed bangalore torpedoes and explosives to seal the ports or blow up the machine guns. The Marine infantry covered these efforts with a barrage of fire, while crawling inch by inch along the shore.
The result of these efforts was that on the first night the Marines held two small pockets, one at the northwest end of the island and one in the center, extending 200 yards in all directions from the base of the pier. The Marines occupied positions dug in the sand, dug with shovels and by hand.
Their ammunition and the Marines’ medical supplies were low, as the loading of the ships in New Zealand had not been done properly.
Critical supplies had been loaded first, and as a result were the last to be unloaded in the ships’ holds. When there was an immediate need for ammunition and medical supplies on the coast, they were buried in ships, under vehicles and quantities of ice cream, so that it took hours for them to surface and be sent to the coast.
What the Marines feared most was a nighttime Japanese counterattack, which was almost certain to throw the Americans into the sea, as the number of Marines on the coast was small due to heavy losses (30% of the total strength of the battalions), while their defensive position was extremely weak. However, this attack did not come, as did the mortar shells that the Americans were expecting, which would have caused heavy losses to the densely packed Marines on the coastal strip.
The failure to launch a counterattack, according to one view, is due to the destruction of the Japanese communication cables by the heavy bombing, which prohibited the transmission of appropriate orders. According to another view, it is due to the defensive doctrine of Shibasaki, who believed that the Americans would wear themselves out by attacking only the strong fortifications.
As for the first case, the excuse has limited validity, since the preparation of the attack could be done by messengers, while in the second, Shibasaki did show a great lack of strategic foresight, and the strongest defense, when it remains passive, time works against it, since the enemy is free to reinforce, maneuver and generally devise ways to break it.
Within this logic, Shibasaki might not have even considered the existence of a reserve force that would carry out counterattacks, using all his men in static fortified positions.
And indeed, all night the Americans were reinforced with heavy weapons, as the LVTs carried out continuous routes carrying the light and easy-to-use 75 mm mountain guns. These amazing guns reached the shores even on improvised rafts, by Marines swimming in the darkness of the lagoon, amidst sporadic sniper fire.
D+1: The First Breaks in the Fort
The lack of Japanese response gave the Marines the breathing space they needed to reinforce and reorganize.
Sup ordered the 1/8th Battalion to land on “Red 2” at first light. The men on the shore turned to the sea to watch the savage spectacle of the 1/8th Marines swimming to shore under heavy Japanese fire.
The only support was provided by the 75 mm guns, which, firing low-elevation shells with slow-burning shells, occasionally managed to silence the Japanese guns.
The 1/8th’s casualties were heavy, but the important thing was that the Battalion lost all of its heavy weapons. However, the rising sea level in the following hours allowed the LCMs to approach the shore with half-tracks carrying 75 mm guns, 37 mm towed guns, and jeeps with radios.
In the center of the “Red 2” beach, the remnants of the 1/2 and 2/2 Battalions organized themselves into a body of 200 men led by the captains of Companies A, B, and E, and at 13:00 they launched an attack southward, attempting to break through the beach to the ocean side. Despite heavy Japanese fire, casualties were light, as there were no fortifications in the interior of the island.
Shibasaki had built a hard shell at Betio, but where it broke, its interior was soft. The 200 Marines managed to reach the southern shore and establish themselves in abandoned Japanese fortifications, creating a 200-yard long pocket. This position repelled a minor counterattack and called in reinforcements.
The only serious activity of the Japanese was an air raid by 8 bombers, which, after dropping three rows of bombs without much effect, disappeared.
Major Kyle, commander of the 1/2 Battalion, with a group of .30 and .50 inch machine guns and wire-borne transmitters, managed to reach the pocket in the afternoon and take command.
The 2/8 Battalion, in “Red 3”, continued to attack eastward that day, trying to neutralize the steel machine gun at the edge of the beach, but without success, as the fire was particularly deadly. Finally, it advanced a 30 mm gun and a Sherman tank to reinforce the location in case of an enemy counterattack.
The 3/8 Battalion, which had been advanced to the triangle formed by the airfield runways, remained in place, reinforcing its trenches. The success of the day was achieved by Major Ryan’s 3/2nd Battalion. Supported by two destroyers and two Sherman tanks, the 2/3rd attacked south, managing within an hour to capture the entire “Green Beach” at the western end of Betio. The width of the strip held by the Marines was 300 yards to the east.
Following this success, General Smith ordered the 6th Marine Regiment to be detached and landed on the island. The 1/6th Battalion landed in rubber boats on “Green Beach”, along with a detachment of the 2nd Tank Regiment. The rest of the regiment landed on “Red 2”. The 2/6th Battalion landed on Bairiki Island east of Betio, in order to seal off a possible Japanese escape route. Finally, the 3/6th Battalion embarked on LCVPs and remained afloat as a floating reserve.
The other positive of the day was the landing of all the batteries of the 1/10th 75mm Artillery Squadron on Betio, as well as two batteries of the 2/10th Squadron on Bairiki.
D+2: Japanese defenses collapse
The continuous reinforcement of the American bridgehead throughout the night of 21/22 November with light tanks, 75 mm self-propelled guns and 35 mm towed guns gave the Marines confidence that they could launch a powerful attack the next day. The attack would be preceded by a naval bombardment lasting 20 minutes on four occasions, namely at 07:00, then at 08:30, again at 09:30 and again at 10:30, while an air bombardment would follow.
The Marine battalions would attack as follows: The 1/6th would break through the 3/2nd Battalion’s lines and attack east along the south shore to link up with the 2/2nd and 1/2nd Battalions’ pocket. At the same time, the 1/8th Battalion would attack west to neutralize a fort in the center of the shore, while the 2/8th and 3/8th Battalions would attack east toward the base of a small pier.
The 1/8th Battalion’s attack began with the assistance of 3 light tanks, which literally placed their guns in the machine gun ports and blew up those inside the fortifications. Mines and Japanese fire, however, disabled two of the tanks, forcing the third to retreat.
The 75 mm guns on the tracks seemed more useful, but they were too exposed to approach the Japanese fortifications. Eventually, a combination of infantry and engineer teams allowed a few machine guns to be disabled, but overall the 1/8th Battalion advanced no more than a few dozen meters. Its men dug trenches and remained there all day.
At 0800, the 1/6th Battalion began its attack from the “Green Coast” to the east, with 5 light tanks in front, followed by 3 companies of Marines in column, the first of which carried all the battalion’s flamethrowers and explosive charges. The 1/6th’s advance was surprisingly easy and by 1100, when it reached the pocket of the 1/2 and 2/2 Battalions, it had killed at least 250 Japanese.
This success resulted in the 1/6th being ordered to continue the advance along the coast, attacking in conjunction with the 3/8 and 2/8 Battalions located in the “Red 3”. This time, the 1/6th would have naval and air support, as well as 7 light and 1 medium tanks.
The 2/8th and 3/8th Battalions would attack east along the north shore, attempting to neutralize a defensive position of 3 forts located at the base of the breakwater. One of these was a steel machine gun, whose fire had caused enormous losses to the Americans since the first day of the landing. The second fort was a concrete structure covered in sand, located south of the steel machine gun. The third fort was a coconut tree trunk machine gun, also covered in sand. All 3 forts were mutually overlapping.
At 09:30, just before the companies of the 2/8th Battalion attacked, one mortar shell from the dozens that were hitting the Japanese forts managed to pass through the log fortification, reach the ammunition dump and blow the entire enemy position into the air. At about the same time, several 75 mm shells from a tank managed to penetrate the steel machine gun and put it out of action. Now only the third hillfort remained. The only way to neutralize it was for the Marines to climb to its top and throw explosives into its portholes.
The attack on the top was led by an engineer team with flamethrowers, under cover of infantry fire. As they climbed the fort, the Japanese launched an attack against them, which was abruptly halted when they received a barrage of fire from Second Lieutenant Bonnyman’s flamethrower, which burned most of the Japanese. Eventually this fortification was also neutralized with the use of explosives.
The neutralization of these fortifications allowed the 2/8th to advance further east and secure the area between the lagoon and the airfield. Alongside it, the 3/8th Battalion also advanced to the southern end of the airfield and took up defensive positions facing east.
Meanwhile, the 3/6th Battalion, which was at sea, was ordered to land on the “Green Coast” and prepare to attack eastward. At 17:00 its commander, Lieutenant Colonel McLeod, received the order and followed the 1/6th’s route along the south coast. Arriving 400 yards behind the 1/6th, they halted and were ordered to dig trenches.
Night Attacks
On the morning of 22 November, the commander of the 2nd Marine Division, General Smith, moved his headquarters from the landing ships to the shore of Betio. Despite the Marine advance, there were still several strong pockets of Japanese resistance, which would be cleared as before. However, the cost in Marine lives had created a depressing atmosphere in Smith’s headquarters, resulting in his report to Admiral Hill speaking of “a slow and extremely costly advance in life”.
On the night of 22/23 November, Smith attempted to reorganise his units. The 2/8th and 3/8th Battalions would be moved to Bairiki Island for rest and reorganisation. The 3/6th Battalion would pass through the 1/6th’s positions and attack east to eliminate the Japanese positions on the eastern end of the island, while the 2nd Regiment, supported by the 1/8th Battalion, would attack west to eliminate the fortifications on the boundary of the “Red 1” and “Red 2” beaches.
In support of these attacks would be the fire of Hill’s ships and aircraft, as well as the 75 mm batteries that had been landed, while during the night the 4/10th 105 mm Artillery Squadron would also be landed.
While these orders were being transmitted, the Japanese began to launch a series of fierce attacks on the advanced positions of the 1/6th Battalion. At 19:30 a group of 50 Japanese infiltrated between Companies A and B, with the aim of drawing American fire to expose the Marine formation. Marine fire discipline was excellent and no machine guns opened fire. The Japanese were defeated by a reserve force from the 1/6th Command Company, which, in a close-quarters battle with hand grenades and bayonets, routed the Japanese. At the same time, Marine artillery and two destroyers began shelling the area in front of Company A, 1/6th.
At 23:00, another small Japanese force launched a raid with howitzers, hurling hand grenades at the positions of Company A, 1/6th. At the same time, 50 Japanese attacked Company B. Both attacks were met with machine gun and 81 mm mortar fire, but the positions of the two companies were exposed. At 0300 the Japanese Marines launched their main attack with fanatical fury. At least 300 Japanese in a line made a frantic charge, shouting, throwing hand grenades and machine-gunning the American positions.
The Marines returned heavy fire, and where the Japanese reached the American trenches, a fierce fight with bayonets and knives took place. Within an hour, most of the Japanese were dead and wounded. At dawn, more than 200 bodies were discovered in front of the American positions and another 100 further away, dismembered by artillery shells. However, another 500 Japanese were still in Betio.
D+3 to D+8: Tarawa in Marine Hands
At dawn on November 23, the American attacks were launched that would put an end to organized Japanese resistance on Betio. On the eastern edge, after an hour of intense naval and air bombardment along 2,000 yards of enemy territory, the 3/6th Battalion, with 7 light and 2 medium tanks as a vanguard, began to advance eastward.
The Marines were essentially on a parade, as most of the Japanese were dead from American fire or from their own hands, having committed suicide. A total of 475 bodies were found, only 14 prisoners were taken, and these were Korean laborers.
At the boundary of the Red 1 and Red 2 beaches, the 1/8th and 3/2nd Battalions attacked to eliminate the fortifications that had caused the greatest losses to the Marines. After three hours of fighting, at 13:05, Colonel Sup reported that the beaches were now secure, the fortified Japanese having been killed or committed suicide. At 13:30, General Smith, after 76 hours of bloody fighting, declared Betio a safe area. However, for several days Marine teams would uncover individual Japanese, who would die fighting.
The battle for the complete capture of Tarawa, however, did not end until 28 November, when the 2/6th Battalion, searching the islet of Taritai, annihilated a Japanese force in a fierce night battle, during which 175 Japanese were killed. The 2/6th lost 32 officers and men, while 59 Marines were wounded. The end of Operation Galvanic, like its beginning, was equally bloody.
The losses on both sides were horrific. The 2nd Marine Division counted 57 officers and 925 Marines killed, while the long list of wounded included 90 officers and 2,072 Marines, while 88 more Marines were never found and were listed as missing. The casualty rate of the 2nd Marine Division was 18.8% of the total force, but the casualty rate per unit was very high.
The assault companies of the 1st, 2nd, and 3rd waves lost 70% of their strength, while the 2nd Amphibious Tractor Battalion, out of its 661 officers and men, lost 323 (including its commander, Major Drew).
The annihilation of the Japanese garrison was complete. Of Shibasaki’s 5,000 men, only 146 survived as prisoners, and these were Korean laborers. None of the Japanese Marines surrendered.
They fell fighting even when all was lost, while those who feared being captured committed suicide by putting their gun to their necks and pulling the trigger with their toe or by placing a grenade in their bodies.

